
latest
habitat tv

Say goodbye to the morning scramble for keys, coats and sunglasses and hello to this… see this and more videos
blog

Re-living the 1980s through art
Clint C is an artist whose work instantly sparks recognition and joy. Based in Hamilton,… more
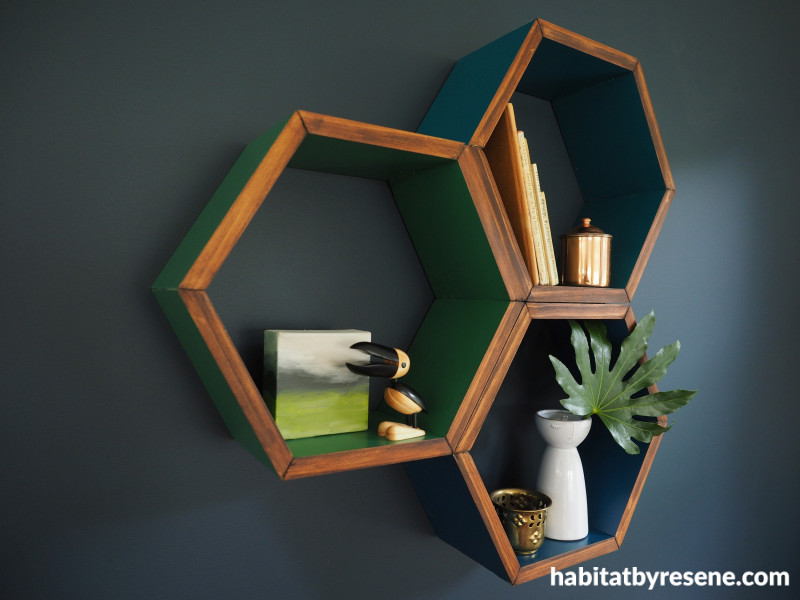
Sweeten your interiors with these honeycomb shelves
30 Sep 2021
Bee Aware Month isn’t just for the kids – spruce up your home with these sophisticated honeycomb shelves that are sure to have your guests buzzing. Made from untreated pine, you can tailor the colour of these shelves to suit your home’s colour palette. Try a mix and match approach with some shelves in wilderness-inspired Resene paints and others stained in rich Resene Colorwood stains.
For more info on Bee Aware Month, click here
You will need:
- 5m length of untreated dressed pine 140mm wide
- Mitre saw
- Measuring tape
- Sandpaper
- Small micro fibre roller
- Resene Quick Dry primer
- Paintbrush
- Your choice of Resene testpots – Fleur used Resene Green Pea, Resene Retro and Resene St Kilda
- Wood glue
- Masking tape
- Cloth
- Resene Colorwood Teak
- Resene Danska Teak Oil
- Three small L-shaped brackets
- Electric drill and screws

Step 1: Set your mitre saw to a cutting angle of 30 degrees and cut your length of wood into 18 equal lengths so that the long side of the finished board in 18cm long. Use sandpaper to remove any rough edges.

Step 2: Use a small micro fibre roller to apply Resene Quick Dry primer to the front and back of the boards. Fleur found it quicker to line all the boards up and go over them with the roller together rather than individually.

Step 3: Once you have painted both sides and the primer is dry, give the primer a quick sand with a fine grit sandpaper. Remove any dust with a soft dry cloth. Use a paintbrush to paint on two coats of each of your chosen colours. Fleur used three different colours, one colour for each hexagon – Resene Green Pea, Resene Retro and Resene St Kilda. Once the paint is dry, sand the edges to remove any paint that may have gotten on them.

Step 4: Use wood glue to glue your hexagon together. Fleur found it helpful to use some masking tape to hold the edges together while the glue dried.
If you are unsure of the strength of your glue or you want to put heavy items on your shelf, then you may want to screw or nail your corners together. If you use screws, it’s a good idea to drill a pilot hole first to keep the wood from splitting. You will achieve a better finished look if you countersink the hole, use hole filler, sand the filler smooth and paint over it.

Step 5: Along the exposed front edge of the shelves, Fleur used a soft cloth to rub on one coat of Resene Colorwood Teak, followed by two coats of Resene Danska Teak Oil. For the oil, apply it and then let it sit for 20 minutes before wiping the excess off. Do this twice. 
Step 6: Glue or screw the hexagons to each other.

Step 7: Screw a small L-shaped bracket onto the back bottom inside shelf of each hexagon. The items on your shelves should obscure the screws and brackets from view. The size of your brackets will depend on how big you have made your shelves and how heavy the objects are that you plan to place inside.
Use screws to mount the shelves to your wall, ideally screwing them into wall studs or using plasterboard screw anchors.

project and images Fleur Thorpe
Published: 30 Sep 2021

