
latest
habitat tv

Say goodbye to the morning scramble for keys, coats and sunglasses and hello to this… see this and more videos
blog

Re-living the 1980s through art
Clint C is an artist whose work instantly sparks recognition and joy. Based in Hamilton,… more
Three easy projects to show your love this Valentine’s Day
10 Feb 2022
Valentine’s DIY Project: 3D Heart Frame
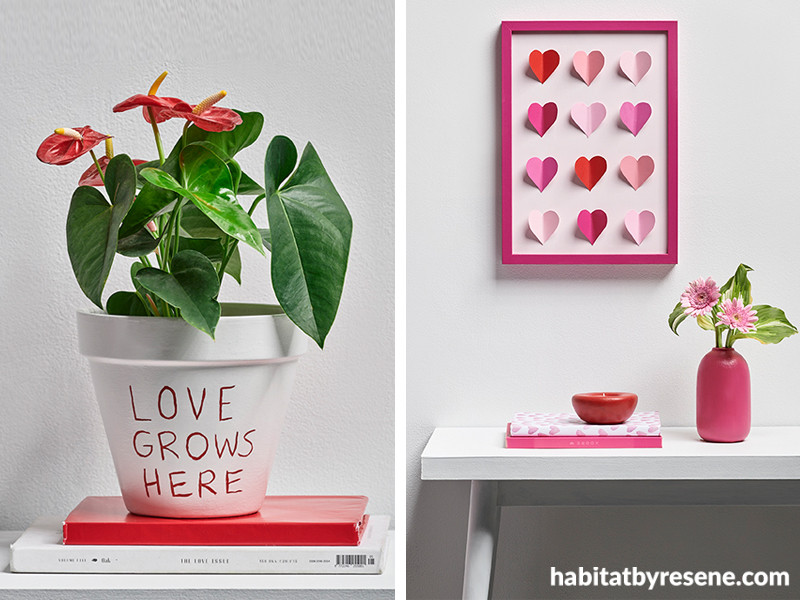
Show your love this Valentine’s Day with a beautiful heart art frame. Reuse old picture frames and write little love messages for your beloved for a bespoke gift.

Frame painted in Resene Scrumptious, with hearts in Resene Pale Rose, Resene Smitten, Resene Cupid, Resene Scrumptious, Resene Glamour Puss, Resene Roadster and Resene Ballerina. Wall and console table in Resene Alabaster, vase with flowers in Resene Irresistible, tealight holder in Resene Smashing.
You will need
1x A3 picture frame (Vanessa bought hers from Kmart)
Resene Waterborne Smooth Surface Sealer
6 x pieces of A4 cardboard
Double sided tape
Scissors
Pencil
Resene testpot brushes
Heart shaped template (you can make your own out of cardboard)
Resene testpots in your choice of Resene colours; Vanessa used Resene Pale Rose, Resene Smitten, Resene Cupid, Resene Scrumptious, Resene Glamour Puss, Resene Roadster and Resene Ballerina.
STEPS:
Step 1: Remove the glass and backboard from frame and give the frame two coats of Resene Waterborne Smooth Surface Sealer
Step 2: Paint the backing board to the frame in Resene Pale Rose
Step 3: Paint the frame in two coats of your favourite colour. Vanessa used Resene Scrumptious.
Step 4: Paint your cardboard pieces in your desired colours. Paint both sides of the cardboard. Vanessa used Resene Pale Rose, Resene Smitten, Resene Cupid, Resene Scrumptious, Resene Glamour Puss, Resene Roadster and Resene Ballerina.
Step 5: Once the cardboard is dry, use your heart template to draw your heart shapes onto the cardboard. Vanessa’s heart template was approximately 5cm wide and 6cm tall.
Step 6: Cut the hearts out and fold in half.
Step 7: Apply a small strip of double-sided tape to the middle fold of each heart.
Step 8: Lay your painted folded hearts onto the painted backboard and remove the double-sided tape strips and stick onto the board. Repeat the process for all hearts.
Step 9: Stick the backing board with hearts into the frame.
Step 10: Hang on a wall or lean on a sideboard. This project would also be great in a kid’s room.
Top tip: You can make the hearts in this frame smaller or bigger it is up to you. You can also make a smaller frame with smaller hearts. You could also try doing an ombre effect with hearts going from light to dark pink or add in some metallic hearts with Resene FX Metallic. There are plenty of fun options to try with this project
project Vanessa Nouwens
image Bryce Carleton

Plant pot in Resene White with lettering in Resene Smashing. Wall and cabinet painted in Resene Alabaster.
Valentine’s gift idea: Make your own Love Grows Here Pot
You will need
1 x terracotta pot (Vanessa’s was a size 19 pot)
Resene testpots in your choice of Resene colours; Vanessa used Resene White and Resene Smashing
Resene Aquapel & Terracotta Sealer
Resene testpot paintbrush
Thin artist’s paintbrush
Plant
Pencil
Step 1: Paint your pot inside and out with Resene Aquapel & Terracotta Sealer.
Step 2: Paint your pot in your desired base colour. Vanessa painted hers in Resene White.
Step 3: Using a pencil write your message onto the pot ready for painting.
Step 4: Using a thin paint brush, paint over your pencil writing (Vanessa used Resene Smashing for the lettering).
Step 5: Pop in a plant and give to someone special.
project Vanessa Nouwens
image Bryce Carleton

Wreath base in Resene Cupid with hearts in Resene Cupid, Resene Irresistible, Resene Princess and Resene Smitten. Chair in Resene Scrumptious and wall in Resene Alabaster.
DIY decorative heart wreath
You will need
10 mini heart shaped boxes with lids which are 7cm x 7cm ( Vanessa’s were from Spotlight), or you could create your own using cardboard
A wooden wreath which is 50cm in diameter
Twine for hanging
Glue gun (or super glue)
Resene testpots in your favourite colours; Vanessa used Resene Cupid, Resene Irresistible, Resene Princess and Resene Smitten
Resene testpot brush
Step 1: Paint your wreath your chosen colour. Vanessa used Resene Cupid.
Step 2: Separate the heart boxes from their lids and paint both the lids and the box in your selection of colours. You will need two coats for each box to get best coverage. Vanessa used Resene Cupid, Resene Irresistible, Resene Princess and Resene Smitten.
Step 3: Glue each box to the wreath and leave to dry. Vanessa placed her hearts at different angles on the wreath to give it dimension.
Step 4: Using either strong masking tape, a staple gun or glue to attach your twine to the back of the wreath ready to hang.
Step 5: Hang the wreath on your front door, in a hallway or bedroom - anywhere that makes you happy. This would also look cute in a child’s bedroom.
project Vanessa Nouwens
image Bryce Carleton
Published: 10 Feb 2022

