
latest
habitat tv

Say goodbye to the morning scramble for keys, coats and sunglasses and hello to this… see this and more videos
blog

Re-living the 1980s through art
Clint C is an artist whose work instantly sparks recognition and joy. Based in Hamilton,… more
Three simple and quick Easter DIYs for festive celebrations
07 Apr 2022
Sometimes the simplest crafts can be the most effective, especially when you’re trying to juggle outdoor egg hunts and visits from the Easter bunny. Resene has three simple DIYs to try before Easter to get you in the festive spirit.
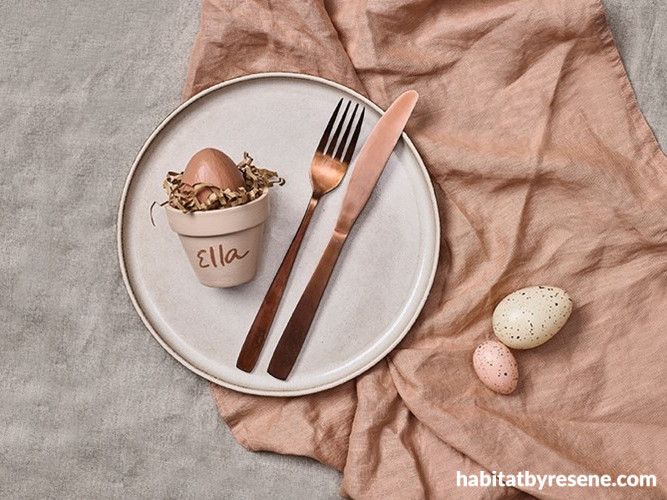
How to make your own Easter place setting
You will need:
- Small terracotta pot
- Pencil
- Thin paintbrush for lettering
- Resene testpots in your choice of colour, Vanessa used Resene Cashmere and Resene Sante Fe
- Resene testpot paintbrush
- Paper straw
- Papier-mâché egg (optional)
Step 1: Paint your mini terracotta pot in your desired colour. Vanessa used Resene Cashmere.
Step 2: Write the name on the pot in pencil.
Step 3: Paint over the name in another paint colour (Vanessa used Resene Sante Fe).
Step 4: Pop in some paper straw and add either a faux papier-mâché egg (Vanessa’s was painted in Resene Sante Fe) or a small chocolate egg.
Step 5: Place on your plate as a name table setting.
project Vanessa Nouwens,
image Bryce Carleton

This adorable Easter pot was painted with Resene Cashmere and Resene Sante Fe. Linen tablecloth from H&M.
-----
How to make your own mini Easter pot table décor

Pots painted with Resene Dingley, Resene Cashmere, Resene Sante Fe, Resene Putty, Resene Highland and Resene Laser. The background wall is painted in Resene Merino. Rattan cabinet from Kmart.
You will need:
- 6 small terracotta pots (these are 6cm in size)
- Skewers
- Polystyrene Easter eggs (or create your own using papier-mache)
- Resene testpots in your choice of colours, Vanessa used Resene Dingley, Resene Cashmere, Resene Sante Fe, Resene Putty, Resene Highland, Resene Villa White and Resene Laser
- Resene testpot paintbrush
- Thin artist’s paintbrush for writing
- Paper straw
- Pencil
Step 1: Take a skewer and push into the polystyrene Easter egg. Paint both the Easter egg and skewer in the same colour.
Step 2: Paint each of the mini terracotta pots in a different colour. You will need two coats of paint for best finish. Vanessa used Resene Dingley, Resene Cashmere, Resene Sante Fe, Resene Putty, Resene Highland and Resene Laser.
Step 3: Using a pencil write the letters ‘Easter’ on each of the terracotta pots, one letter per pot.
Step 4: Using a fine paintbrush, paint over each letter from the word ‘Easter’ on each of the terracotta pots. Vanessa used Resene Villa White for the lettering.
Step 5: If you have any polystyrene eggs left over, cut them in half and place them into the bottom of the terracotta pots.
Step 6: Place the skewered egg into the polystyrene at the bottom of the terracotta pot and add some paper straw on top to cover the polystyrene.
project Vanessa Nouwens
image Bryce Carleton
-----
How to make your own bunny treat boxes

Treat boxes are painted with Resene Paper Doll, Resene Milk Chocolate and Resene Tea. The background wall is painted in Resene Merino.
You will need:
- Small square boxes with lid (Vanessa’s was 10cm by 10cm in size)
- Pom-poms (either make your own using yarn or buy them ready made)
- Resene testpot paintbrush
- Resene testpots in your choice of colours, Vanessa used Resene Paper Doll , Resene Tea and Resene Milk Chocolate
- Small fine paintbrush to paint the face details
- Piece of cardboard
- Pencil
- Scissors
- Glue
Step 1: Paint your box both inside and out in your chosen colours. Vanessa used Resene Paper Doll and Resene Tea.
Step 2: Paint a piece of cardboard in Resene Paper Doll and Resene Tea (this is for the bunny ears).
Step 3: Using a pencil draw the bunny’s ear shape onto cardboard freehand or find a template online that you can print out and use.
Step 4: Cut out bunny cardboard ears with scissors.
Step 5: Glue ears to the back of the lid.
Step 6: Using your pencil draw the bunny’s face onto the box.
Step 7: Paint over the pencil face outline using a fine paintbrush, Vanessa used Resene Milk Chocolate. Use an eraser to remove any access pencil lines.
Step 8: Glue pom-pom to back of box to act as a tail.
Step 9: Pop in your treats ready for gifting.
Step 10: (Optional) Add paper straw to box if you want or just pop in treats.
project Vanessa Nouwens
image Bryce Carleton
Published: 07 Apr 2022

