
latest
habitat tv

Say goodbye to the morning scramble for keys, coats and sunglasses and hello to this… see this and more videos
blog

Re-living the 1980s through art
Clint C is an artist whose work instantly sparks recognition and joy. Based in Hamilton,… more
Three painting tips for winter makeovers
20 Jul 2022
Rolling up your sleeves to paint winter but aren’t sure where to start? We have a few tips to keep in mind so you can push on with your DIY projects even on cold winter days.
The key factors to take into account with winter painting, whether you’re doing it inside or out, are temperature, timing and moisture. These will all have an impact on how long the paint takes to dry and what your finish will be like. Just keep them in mind when choosing which day(s) you’re going to get stuck in.

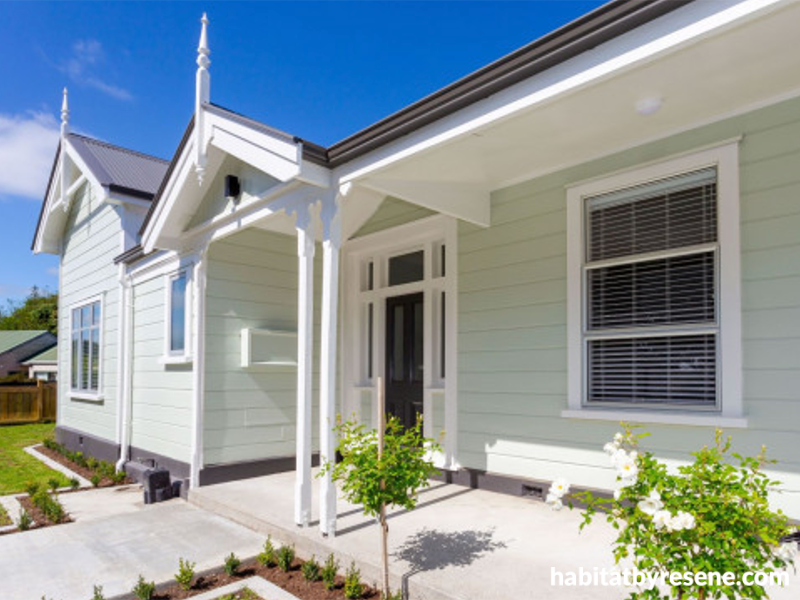
Painting in winter is still possible – you just need the right preparation, conditions and products. Readers Bridget and Tom used Resene Sonyx 101 semi-gloss waterborne paint tinted to Resene Pumice for their matai weatherboard home. The window facings and sills and other trims are painted in Resene Sea Fog. The front door and concrete foundation are painted in Resene Porter.
1. Prep is key
A top tip to remember is that the fundamentals of your preparation – such as taking the time to do the prep well – stays the same no matter what time of year you’re painting!
Exteriors
To prep your exterior, start by taking a walk around your property. Assess its condition and check for any damage. If there are materials or sections that will need replacing, now’s the time to start organising them. Most exterior surfaces will have mould or moss growing on them somewhere. Unfortunately, it’s not enough to remove moss and mould, or paint over it, without first killing it, as residual spores will simply grow back underneath and through new paint.
To treat it, simply use a garden sprayer to apply diluted Resene Moss & Mould Killer following the label instructions. You’ll also want to ensure your house gets a proper clean before it gets painted. The most effective way to do this is to use Resene Paint Prep and Housewash, or, if you’re painting a roof, Resene Roof and Metal Wash. Scrape and sand any flaking paint from timber and wooden joinery, fill any imperfections and seal up any gaps.
Interiors
The same goes for your interior, you’ll want to have clean walls, sanded joinery and trims and any gaps sealed up – and then sanded down. Of course, before you start painting indoors, remove all furniture from the room, or if you can’t do that make sure it is well protected with dropcloths, place dropcloths down to protect the floor and apply masking tape around skirtings, architraves, light switches and window trims.
2. Be aware of the temperature
When paint is drying and the temperature isn’t warm enough, the paint just won’t work, and will crack or even dry into a powder. Generally, painting on a substrate that’s colder than 12°C with normal paint is a no-go. It may be a nice day, but the surface can still be below 12°C – you can paint a side of a house and have it end up on the ground because it didn’t dry.
But all is not lost. One smart way to extend that period of time is by using Resene Wintergrade Additive with your chosen paint, which means your paint will still dry at temperatures as low as 3°C. The Resene Technical team first developed a small range of winterised products that will dry in temperatures down to 3°C, which have been used in winter conditions for over 10 years. Know that it’s best to only dose what will be applied over the next few days, and then to dose each portion of paint as it is needed.
Key things to note about using Resene Wintergrade Additive:
- Recommended for Resene waterborne paints.
- Resene Wintergrade Additive is more effective in lighter colours, i.e. those without high levels of tinter. While it will help the film forming and cure of darker shades (mid-tone and above, and coloured bases) the reaction is slower due to the higher tinter loading.
- If colours are required, tinting formulas must be adhered to. Excess tinters may inhibit the low temperature curing nature of the product.
- The key is to ensure there is time for the paint to cure and it’s not too cold.
- E.g. Avoid using the additive in dark colours on a cold day after 3pm on the south side of a house.
3. Keep condensation out
Things are a little easier when it comes to painting indoors in winter, though there are still some key factors to consider such as temperature and moisture, particularly in older houses.
Condensation on windows, or ‘crying windows’ is one indoor issue that can cause problems. All that water has to run somewhere, so often it ends up on the windowsills and in cracks. When it dries, it can lift the paint. Try running a heat pump or heater for a while before painting to get your home to an even, comfortable temperature of around 15-16°C. Keep the windows open for ventilation and airflow while the paint is drying, and if you have access to a dehumidifier, you can get that going as well to help the drying.
Wallpapering is also a popular project for the cooler months. Luckily it’s easy to do with paste the wall options, no matter what the weather is doing outside.
And if you have a list of decorating projects you plan to tackle in spring, why not get a head start on your prep work? That way you’ll be ready to start staining or painting in spring and you can spend more of the warmer months enjoying your fresh stain or paint finish rather than finishing the job off.
Published: 20 Jul 2022

