
latest
habitat tv

Say goodbye to the morning scramble for keys, coats and sunglasses and hello to this… see this and more videos
blog

Brick Bay unveils its poetic new folly for 2026
The winner of the 2026 Brick Bay Folly competition has been unveiled. Within the Wings… more
Pegs and popsicle stick kids craft projects
20 Dec 2022
A craft project a day keeps the boredom away. Entertain kids with these easy arts and crafts projects using pegs and ice block sticks.
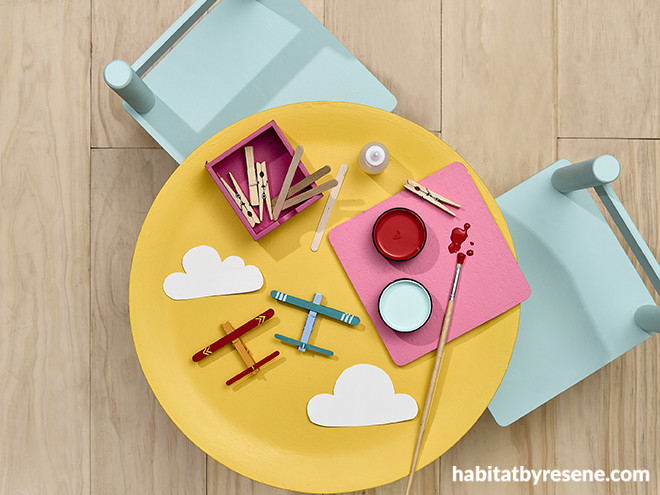
When pegs fly

Fly high with these cute wooden planes. Red plane in Resene Guardsman Red, Resene West Side and Resene Bright Spark, blue plane in Resene Surfie Green, Resene Pattens Blue and Resene Charlotte and clouds in Resene Rice Cake. Flooring in Resene Colorwood Natural, chairs in Resene Reservoir, table in Resene Bright Spark, pink painting mat in Resene Glamour Puss and pegbox in Resene Rouge.
Pegs, ice block sticks and paint are all you need to be ready for take-off with these wooden planes. When you’re done playing, use string to hang them from the ceiling.
You will need:
- Resene testpots in your choice of colours – we used Resene West Side, Resene Guardsman Red and Resene Bright Spark (red plane) and Resene Surfie Green, Resene Pattens Blue and Resene Charlotte (blue plane)
- Paintbrush
- Wooden pegs – one per plane
- 2 ice block sticks (for the front wings)
- 2 small craft sticks (for the back wings and tail)
- Small button
- Glue
Paint a peg in your favourite Resene colour. Paint two large and one small stick (for the plane’s front and back wings) in a contrasting colour. Paint the remaining small stick (for the tail) in your favourite colour. For the details, paint small lines or arrows on your ice block sticks and paint the button. Trim tail stick to 2cm in length.
Assemble the plane by gluing the large ice block sticks towards the front opening part of the peg, with one stick on the top of the peg and one stick underneath. Next, glue one of the small craft sticks to the other end of the peg (this will make the rear wings). Glue the tail craft stick to the top of the back wing. Finally, make the cockpit by gluing the button onto the front of the peg.
What a croc!

You’ll be taken in by the welcome grin of these friendly crocodiles painted in Resene Forest Green, Resene Green House, Resene Red Berry and Resene White (for the mouth and teeth). Make a chomping ground for your crocs by painting a box in Resene Reservoir with greenery in Resene Half Limerick and Resene Kermit. Craft and pencil jar in Resene Gondwana. Background painted in Resene Bunting and Resene Jordy Blue.
Your kids will be hopping and bopping to the crocodile rock with these cute peg crocs.
You will need:
- Resene testpots in your choice of colours – we used Resene Red Berry, Resene White, Resene Black, Resene Forest Green and Resene Green House
- Paintbrush
- Wooden pegs – one for each crocodile
- Craft paper
- Scissors
- Glue
- Small pebbles/beads/buttons or cat’s eye shells (for eyes)
- Pipe cleaners (for legs)
Paint the pegs and allow them to dry. To make the scales on the back, cut a strip of paper or card that is the same width as the peg but 1.5 times as long and paint it in either the same Resene colour or a complementary one.
Paint the inside of the peg red for the mouth and when dry, paint small dots for teeth. To make the eyes, paint two small round items (try pebbles, beads, buttons, shells or similar) white and allow them to dry. Then paint the pupils. Make the crocodile’s back by folding the strip of painted paper into an accordion fold. Glue the paper to the top of the peg and glue the eyes in place. To make the legs, cut the pipe cleaners into approximately 2.5cm lengths and fold in half, bending the ends slightly to create tiny feet. Glue two sets of legs to the peg. Your crocodile is ready to rock!
Easy rider

All aboard the fun bus! The bus chassis is in Resene Guardsman Red, with wheels in Resene Black and Resene Charlotte and lights in Resene Bright Spark. The road is in Resene Nero, the centre line is in Resene Rice Cake and the background is in Resene Sherbert.
This bus, built from ice block sticks, can be used as a photo frame or to display favourite illustrations.
You will need:
- 5 ice block sticks
- 3 large craft sticks (or you can use 6 normal-
- sized ice block sticks)
- Paintbrush and small craft brush
- Glue
- Plastic milk-bottle cap
- Plain piece of card
- Scissors
- 3 small round buttons
- Resene testpots in your choice of colour – we used Resene Guardsman Red, Resene Black, Resene White, Resene Charlotte and Resene Bright Spark
- A piece of card the length and width of all three windows combined
Paint the large and small craft sticks with two coats of your chosen Resene colour. To make the cabin, cut off the rounded end of four of the smaller ice block sticks to make them square at both ends. Arrange them vertically in evenly spaced rows, then glue an ice block stick across the top of the other four to make the roof. Place three larger craft sticks flush in a row beneath the bus cabin and glue to the exposed ends of the thin ice block sticks. To make the wheels, use the milk-bottle cap to trace a circle on your piece of card and repeat. Cut out the circle and paint it your choice of Resene colour.
Glue one button, painted in your choice of Resene paint, onto the centre of each wheel. For the headlight, paint the third button in a lighter colour.
Glue on the wheels and headlight. Glue the card onto the back of the bus windows and paint family or friends in the windows. Alternatively, place photographs in the windows. If you have more family members, try making a convoy of buses painted in different Resene colours.
projects Sarah Kolver
styling Chrisanne Terblanche
images Bryce Carleton
Published: 20 Dec 2022

