
latest
habitat tv

Say goodbye to the morning scramble for keys, coats and sunglasses and hello to this… see this and more videos
blog

Brick Bay unveils its poetic new folly for 2026
The winner of the 2026 Brick Bay Folly competition has been unveiled. Within the Wings… more
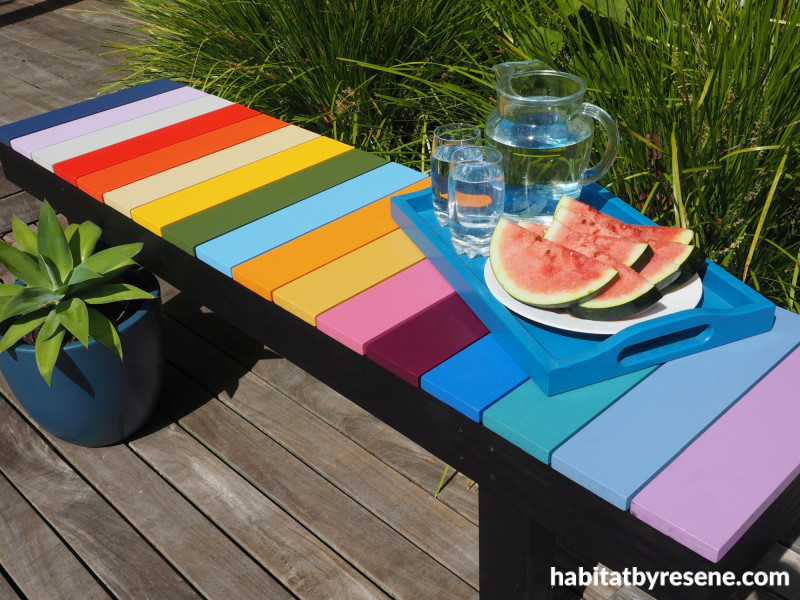
I can seat a rainbow: brighten up your garden with an outdoor bench
24 Feb 2022
Add some colour to your outdoor areas with a garden seat that both young and old will love. Paint a rainbow of colours or match with your house exterior colour.
You will need
- Timber or timber offcuts in the following sizes:
- 17 of 90mm x 18mm HT 3.1 cut to 400mm long (top boards)
- 2 of 90mm x 18mm HT 3.1 cut to 1590mm long (long lengths for the frame)
- 4 of 90mm x 18mm HT 3.1 cut to 360mm long (short lengths for the frame)
- 4 of 50mm x 80mm HT 4 cut to 4200mm long (legs)
- 1 of 24mm x 24mm HT 3.1 to 2.7m long (blocking)
- Saw/drop saw
- Sandpaper medium and fine grit
- Resene Quick Dry
- Small foam roller and painter’s tray
- Paintbrush
- Electric drill
- Resene Woodsman wood oil stain in your choice of colour, Fleur used Resene Pitch Black
- Wood glue
- Resene testpots in your favourite paint colours. Fleur used Resene True Blue, Resene Wonderland, Resene Truffle, Resene Havoc, Resene Daredevil, Resene Putty, Resene Buttercup, Resene Clover, Resene Subzero, Resene Gold Drop, Resene Noosa, Resene Rouge, Resene Blackberry, Resene Half Resolution Blue, Resene Ming, Resene Waikawa Grey and Resene Butterfly

Step 1: Start by cutting the top boards (90mm x 18mm) of the bench into 40cm lengths. Fleur used 17 boards. Sand the ends smooth and wipe any dust away with a dry soft cloth.

Step 2a: Prime the boards with Resene Quick Dry. To save time, line them all up and use a small foam roller and a painter’s tray to paint them quickly.

Step 2b: The same method can be used for the edges and the ends. Once the Resene Quick Dry primer is dry, give the boards a quick sand with fine sandpaper.

Step 3: Paint each of the boards in a different colour using your favourite Resene testpots. Have fun trying out some of your favourite colours.

Step 4: To build the frame of the seat, cut two lengths of 90mm x 18mm HT 3.1 board to 159cm long, and four lengths at 36cm long.

Step 5: Put the two end boards on the inside edge of the two longer boards, and place the two remaining short boards set back from the ends by 30cm.

Step 6: Use an electric drill to pre-drill the pilot holes for the screws. It’s a good idea to countersink the holes as well.

Step 7: Use Resene Woodsman wood oil stain (Fleur used Resene Pitch Black) to stain the boards for the frame. Apply two coats, allowing each coat to dry thoroughly before reapplying (this could take 24 hours).

Step 8: Cut the wood for the legs using the 50mm x 80mm HT 4 wood in 42cm lengths. Fleur used H4 treated wood for the legs to give them a higher level of weather protection. As this wood was rough sawn, Fleur sanded it down to make it smoother. Stain the legs with the same Resene Woodsman wood oil stain in Resene Pitch Black and attach with screws 30 cm from the end of the seat.

Step 9: Next, cut lengths of the 24mm x 24mm wood to fit along the inside edge of the frame and screw into place. This is the piece of wood that the colourful top boards will be screwed to.

Step 11: Stain this internal board and once dry, run a line wood glue along both sides. Place your colourful top boards on top of the glue (the glue helps keep the boards in place and makes it easier when you screw the boards on). Fleur used 4mm nails for spacers between each board.

Step 12: Once the glue is dry, flip the bench over and drill pilot holes and screw each of the top boards in place.

This bench seat will add a rainbow of colour to your outdoors.Bench panels in Resene True Blue, Resene Wonderland, Resene Truffle, Resene Havoc, Resene Daredevil, Resene Putty, Resene Buttercup, Resene Clover, Resene Subzero, Resene Gold Drop, Resene Noosa, Resene Rouge, Resene Blackberry, Resene Half Resolution Blue, Resene Ming, Resene Waikawa Grey and Resene Butterfly and base and legs in Resene Woodsman wood oil stain in Resene Pitch Black. House weatherboards painted in Resene Triple Ashwith trim in Resene Quarter Thorndon Cream.
Published: 24 Feb 2022

