
latest
habitat tv

Say goodbye to the morning scramble for keys, coats and sunglasses and hello to this… see this and more videos
blog

Brick Bay unveils its poetic new folly for 2026
The winner of the 2026 Brick Bay Folly competition has been unveiled. Within the Wings… more
Create a 3D wall sculpture for your home
19 Jan 2022

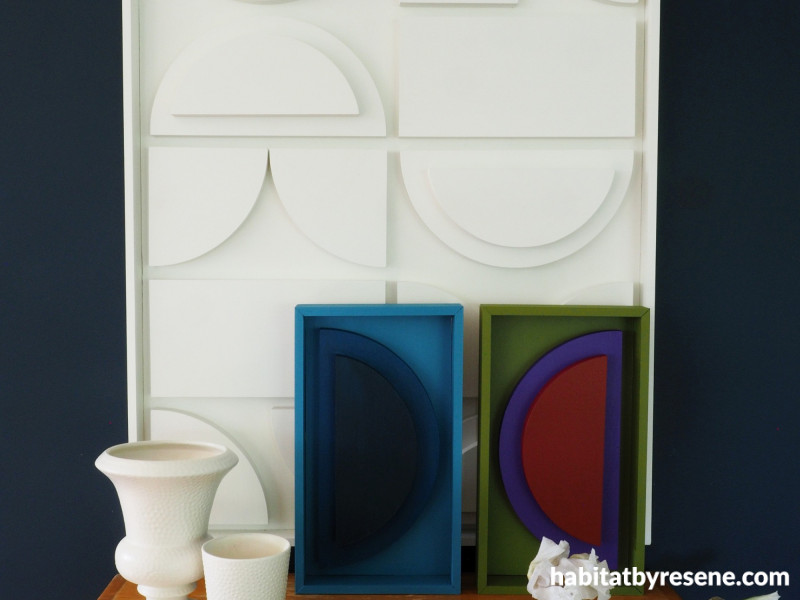
Make this sculptural 3D art piece with plywood shapes and Resene testpots. Add texture to a neutral wall by creating an artwork in a matching neutral Resene colour or choose vibrant colours to match your décor to create the perfect piece.
You will need:
- A panel of 7mm thick interior grade plywood cut down to 790mm x 605mm
- 8m of untreated pine 140mm x 18mm
- 8m of untreated 40mm x 10mm pine trim
- Compass
- Pencil
- Jig saw or band saw
- Sandpaper
- Resene Quick Dry
- Small roller
- Paintbrush
- Wood glue
- Mitre saw
- Resene testpots in your favourite colours. Fleur used Resene Cararra for the basecoat and Resene Elephant, Resene Blumine and Resene Calypso for the blue artwork and Resene Salsa, Resene Blue Diamond and Resene Planter for the green artwork.

Step 1: Start by cutting out your plywood panel so that it is 790mm tall and 605mm wide. Sand off any rough bits and then apply one coat of Resene Quick Dry, using a small roller. Once this is dry, lightly sand over it with fine grit sandpaper, and then apply two coats of Resene Carrara, allowing for the first coat to dry before applying the second coat.

Step 2: Use a compass to make arching shapes on the 140mm wide pine board. Make sure the shapes are combinations of 140mm wide/tall and 280mm wide/tall. Use a jig or band saw to cut out these shapes.
Sand down any rough bits with sandpaper and then as with the plywood panel, prime the shapes with one coat of Resene Quick Dry followed by two coats of Resene Cararra.
For the white art:

Step 3: Use wood glue to glue the shapes to the plywood panel and allow for a gap of 15mm between each shape and from the edge of the panel.

Step 4: Measure and cut some 40mm x 10mm pine trim to form a frame around the plywood panel. Prime this with Resene Quick Dry followed by two coats of Resene Cararra.

Step 5: Glue the frame to the edge of the plywood panel. Screw two small screws into the back of the panel and hang the art with some string stretched between them.

Alternatively, you could experiment with colour, either a gradient of colour such as the blue scheme shown in Resene Elephant, Resene Blumine and Resene Calypso or a green colour palette in Resene Salsa, Resene Blue Diamond and Resene Planter. The wall is in Resene Dark Knight.
Project and images Fleur Thorpe
Published: 19 Jan 2022

