
latest
habitat tv

Say goodbye to the morning scramble for keys, coats and sunglasses and hello to this… see this and more videos
blog

Re-living the 1980s through art
Clint C is an artist whose work instantly sparks recognition and joy. Based in Hamilton,… more
Keep your kids occupied with these two cute Easter crafts
07 Apr 2020
With Easter just around the corner, Alayna Flighty of Kiwi Families created a couple of kid-friendly crafts using some favourite Resene paint colours. Battle boredom by making some egg carton flowers together, or have your own colour contest using her step-by-steptechnique for drawing an Easter bunny in an egg.
DIY egg carton flowers

Egg cartons are great for crafting – kids can make so many fun and simple crafts with them. “I love the simplicity of this egg carton flower idea,” says Alayna. “This is a really great craft to do with younger children. The egg cartons are easy and fun to work with, and I find that young children enjoy painting on different objects and textures. It keeps it interesting for them.”
You will need:
- Egg carton
- Scissors
- Resene testpots in your choice of colours – Alayna’s kids used Resene Colour Me Pink, Resene Buzz, Resene Tomorrow and Resene Kingfisher Daisy
- Pipe cleaners
- Large pompoms
- Dowel or bamboo skewers
- Hot glue
- Paint brushes
Step 1 Cut your egg carton into a square, trim around the sides, and lastly cut off the pointy bit in the middle.

Step 2 Using a range of Resene testpots, paint the inside of your egg cartons. Alayna put out a small selection of testpots for her kids to use.
“I find really bright colours, and contrasting colours are always a hit,” recommends Alayna. “If your kids are anything like mine they’ll enjoy mixing all the colours up on the flower while they are painting them. And for this craft idea, that’s perfect!”

Step 3 While your egg cartonsare drying, twist the pipe cleaners around and up a piece of dowel or a bamboo skewer. This will become the flower stems. You’ll need to use 3-4 pipe cleaners to cover the skewer. You could also add a pipe cleaner leave to the stem by ending one pipe cleaner in a large loop and tying it back in with the next pipe cleaner twist.

Step 4 Once the egg carton is dry, push a large pompom through the back of the carton so the pompom is just poking out of the hole in the middle.

Step 5 Finally, hot glue gun the pipe cleaner stem onto the back of your flowers.

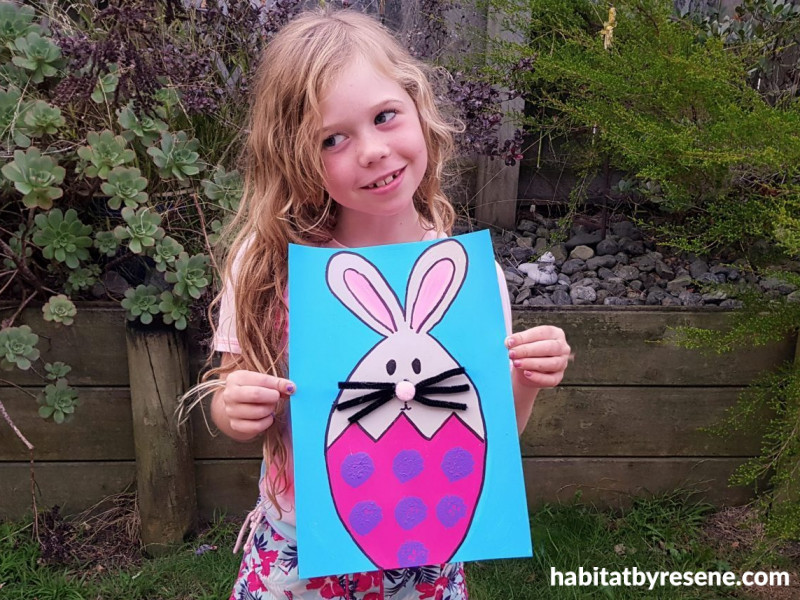
DIY Easter bunny egg drawing

With Alayna’s easy to follow steps, your kids can draw and decorate a festive Easter rabbit. This drawing could make a great Easter card for Nans and Grandads, or a cute painting for your kid’s room.
“This is a pretty simply drawing to do, and most ages can give it a go. Older kids can use the template and copy from that. You’ll need to break it up, and step through it with the younger ones. Once the drawing is complete, it’s simple and fun to paint and embellish,” she says.
You will need:
- Paint brushes
- Resene testpots in your choice of colours – Alayna’s kids used Resene Cloudy, Resene Tomorrow, Resene Kingfisher Daisy, Resene Colour Me Pink, Resene Black and Resene Princess
- Thick A4 paper
- Permanent marker
- 1 small and 1 large pompom
- 2 black pipe cleaners
- 1 peg
- Glue
- Water (for cleaning brushes)
Step 1 Start by drawing three zig-zags one third of the way up the page.

Step 2 Draw a slight curve from the top of your zig-zag to the bottom of the page.

Step 3 Then, draw a slight curve on the opposite side of your zig-zag. This will create the bottom of your egg.

Step 4 Now, draw a curve going upwards to about the middle of your egg. This is the beginning of the rabbit’s head.

Step 5 To draw the first ear, draw a large petal shape, starting from the end of the curve.

Step 6 Then draw another petal shape going out the other way. Try and keep the size and shape of the two ears roughly equal.

Step 7 To complete the outline of the bunny draw a curve from the bottom of the second ear to the end of the zig-zag. To finish the drawing, add two more smaller petals inside the larger petals, this makes the inside of the ears. Yay, you did it!Now it’s time to paint and decorate.

Step 8 First paint your background. Alayna used Resene Tomorrow, which is a brilliant sky blue.

Step 9 Paint the bottom of the egg, Alayna used Resene Colour Me Pink.

Step 10 For the inside of the ears, Alayna mixed Resene Princess and Resene Colour Me Pink together as she quite liked the combination.

Step 11 Paint the bunny’s fur. Alayna used Resene Cloudy, which is a nice moody grey.

Step 12 To embellish your egg a little bit, connect a peg to the large pompom and dip the end of the pompom into the paint and use it to print dots onto the egg. Use a nice contrasting colour from the pink.Alayna used Resene Kingfisher Daisy to really make them pop.

Step 13 Paint in two eyes using Resene Black.
Step 14 Cut up your black pipe cleaners to make whiskers. Three on each side works well. Glue them onto the picturewith a pink pompom nose in the middle.

Step 15 Finally, use the marker to draw a thick outline around the whole picture, including the inside of the ears and the top of the egg. Then, draw a tiny bunny mouth under the nose.
For another great Easter craft idea, check out some of Kiwi Families’ other crafts, including how to make bunny ears. For hundreds more kids art and craft ideas, check out the creative arts and crafts section of their website.
projects and images Alayna Flighty, Kiwi Families
Published: 07 Apr 2020

