
latest
habitat tv

Say goodbye to the morning scramble for keys, coats and sunglasses and hello to this… see this and more videos
blog

Re-living the 1980s through art
Clint C is an artist whose work instantly sparks recognition and joy. Based in Hamilton,… more
How to make DIY arched shelves for your wall
20 Jul 2022
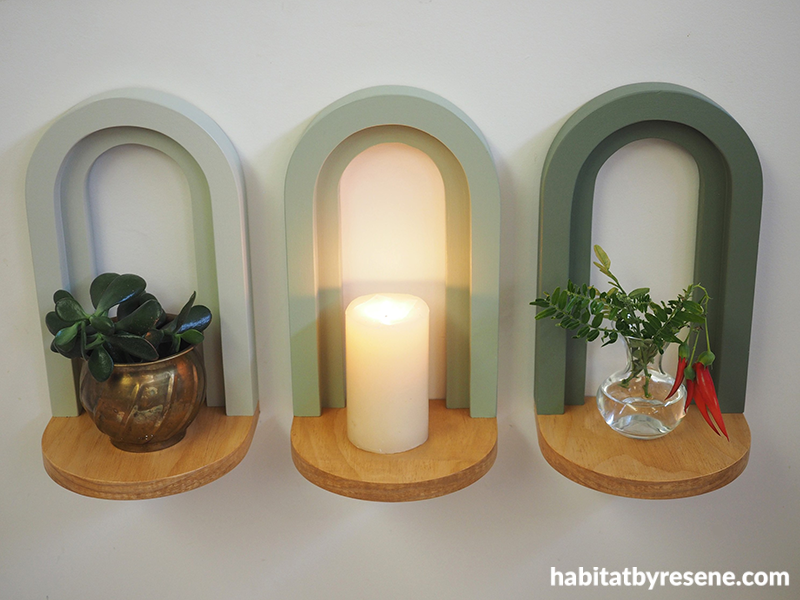
These arched shelves are equal parts adorable and chic. Whether you’d like to create an extra spot in your home for resting a pot plant, a candle or even your car keys, these arched shelves are sure to do the trick.

These shelves glow in the candlelight in Resene Paddock, Resene Frontier and Resene Coriander. Back wall in Resene Carrara. (Just remember to make sure any lit candles are not left unattended!)
You will need:
- Three lengths of 18cm x 18mm x 90cm long untreated pine boards
- Pencil, ruler and compass
- Saw
- Band saw or jig saw
- Sandpaper
- Rag or cloth
- Wood glue
- Wood-working clamps
- Resene Quick Dry
- Resene testpots in your choice of colours (Fleur used Resene Paddock, Resene Frontier and Resene Coriander)
- Paintbrush
- Resene Colorwood in Natural
- Resene Aquaclear
- Screws and an electric drill
How to:

Step 1: Start by measuring out how big you want the arches to be and use a pencil to draw this on to your wood. Fleur’s wood board was 90cm long, so she divided that into three so that she could make each of her arches up to 30cm tall. Allowing for cuts, the final height of her arches was 29cm tall. The width of the legs of her front arch was 2.5cm wide and the back arch was 4.5cm wide. Use a compass to make the top of the arches.

Step 2: Once you have these all drawn out on your board, place another board underneath and screw them together so that the boards don’t move when you are cutting out the arches. Use a band saw or jig saw to cut the arches out. First cut the board into the three lengths and then cut out the top of the arches.

Step 3: Next, cut out the widest, back arch, followed by the front arch. Once you have cut out the three pairs of arches, sand any rough bits smooth on the inside of the arches. Don’t worry about sanding the outside of the arches yet, as you can do that once they are glued together and it will make a much nicer job. Use wood glue to glue the pairs of arches together.

Step 4: While the glue is drying on the arches, you can start work on the shelf. From your third pine board, use a compass to make an arch. If you are using a board that is 18cm wide, set the compass to 9cm and draw a semicircle. Fleur made her shelves 15cm deep. Use a band saw or jig saw to cut the shelves out and use sandpaper to sand any rough edges smooth.

Step 5: Apply one coat of Resene Colorwood Stain in Resene Natural to the shelves. Fleur only did one coat, but if you want a darker colour, you can apply more coats. Once this is dry, apply 2-3 coats of Resene Aquaclear in your choice of gloss level.

Step 6: Once the glue on the arches has dried, sand the outside edge smooth. Wipe the dust away with a soft cloth. Paint each arch with one coat of Resene Quick Dry. Once this is dry, give the arches a light sand with fine grit sandpaper.

Step 7: Paint each of the arches a separate shade of green. Fleur used Resene Paddock, Resene Frontier and Resene Coriander. Apply two coats, allowing for the first coat to dry before applying the second coat.

Step 8: Once the paint has dried, glue and screw the shelves on to the bottom of the arches.

Step 9: Drill a hole in the back at the top of the arch for a nail to fit in. Hang your arches and add your accessories to decorate. These arches work best with light items. If you are planning to place heavier items on them you may need to allow for a larger nail or nails to hang each arch. If you are in an earthquake prone area you may prefer to attach a small bracket under the arch to help secure it to the wall.
project and images Fleur Thorpe
Published: 20 Jul 2022

