
latest
habitat tv

Say goodbye to the morning scramble for keys, coats and sunglasses and hello to this… see this and more videos
blog

Reader roundup: See what our readers have been up to!
Refurbished vintage furniture, charming exteriors and magnet walls for kids. These projects are sure to… more
How to make a DIY jewellery hanger for Mother’s Day
05 May 2022
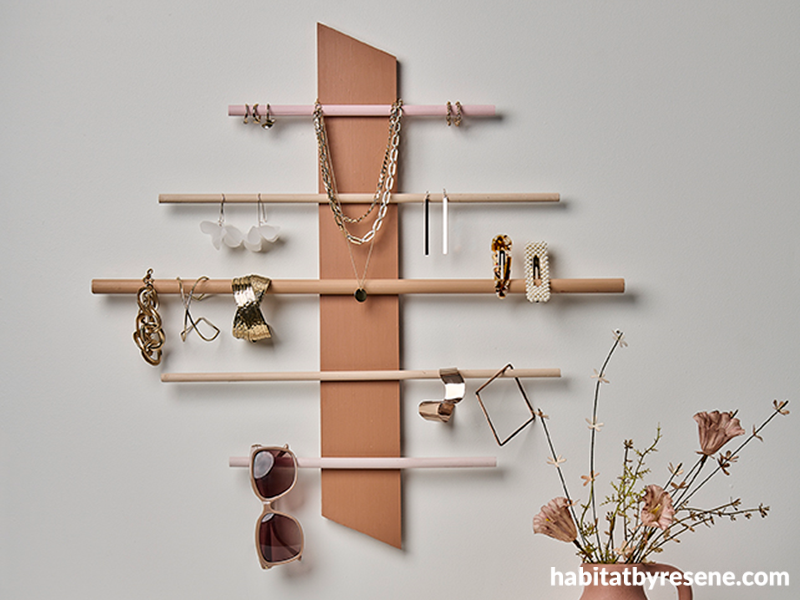
This DIY jewellery hanger is the perfect gift for any mum with a collection of necklaces and earrings and nowhere to store them. Never tangle a necklace again or misplace any precious pieces with this clever organiser.
DIY jewellery hanger

This jewellery hanger for mum is chic and sophisticated in Resene Kalgoorie Sands, Resene Cashmere, Resene Paper Doll, Resene Sante Fe and Resene Wafer. Wall in Resene Merino and console table in Resene Alabaster.
You will need:
- 1 piece of pine which is 60cm in length, 9cm wide and 1cm thick
- 5 pieces of dowel 1x 60cm in length, 2x 45cm in length and 2x 30cm in length (Vanessa also used varied thickness due to dowel availability)
- Screws
- Pencil
- Ruler
- Resene testpot brush
- Resene testpots in your choice of colours (Vanessa used Resene Kalgoorie Sands, Resene Cashmere, Resene Paper Doll, Resene Sante Fe and Resene Wafer)
- Flat picture hanger
- Glue
- Jig saw (a hand saw would work too)
How to:

Step 1: To get the angled ends, draw an angled line at each end of your pine.

Step 2: Using your jig saw or hand saw cut the angled pine.

Step 3: Paint the piece of pine in your chosen Resene colour (Vanessa painted hers in Resene Sante Fe).

Step 4: Paint your pieces of dowel in your Resene colours (Vanessa painted hers in Resene Paper Doll, Resene Cashmere, Resene Kalgoorie Sands and Resene Wafer).

Step 5: On the back of your pine measure 10cm from the top and bottom of your pine and make a pencil mark. That will be where your top and bottom dowel will go. Then measure 10cm gaps for the remaining dowel.

Step 6: Lay your dowel out with pine on top and drill screws into pine and dowel from the back. Repeat for all pieces of dowel.

Step 7: Vanessa glued a flat picture hanger to the back for easy hanging, however you could use 3M strips or screw directly to the wall.
project Vanessa Nouwens
images Bryce Carleton
Published: 05 May 2022

