
latest
habitat tv

Say goodbye to the morning scramble for keys, coats and sunglasses and hello to this… see this and more videos
blog

Re-living the 1980s through art
Clint C is an artist whose work instantly sparks recognition and joy. Based in Hamilton,… more
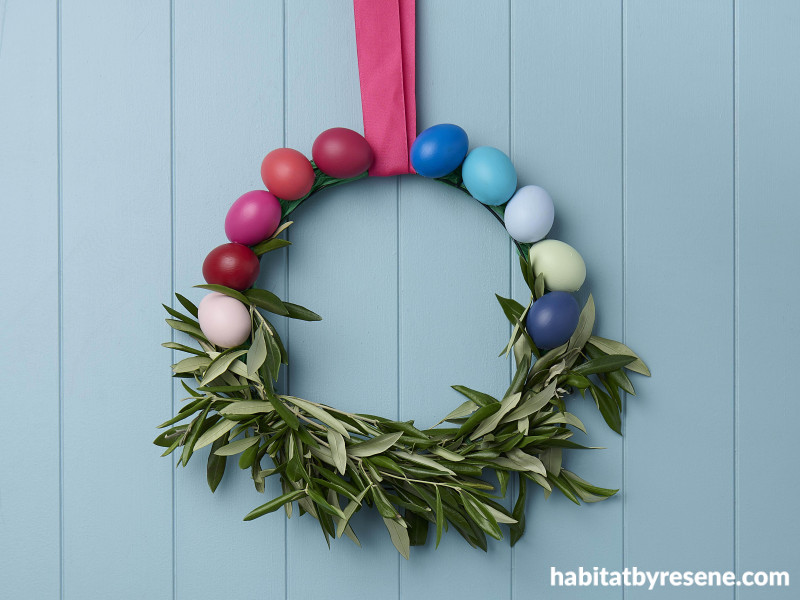
DIY Easter egg wreath
24 Mar 2021
In the spirit of Easter, we created this colourful egg-floral wreath that’s sure to be adored on your door.
We show you how.
You will need:
- Wire wreath frame (you can purchase at florist stores or online)
- Tissue paper
- Blown out eggs (amount depends on size of wreath — for a 10 inch/medium wreath, we used 10 eggs)
- Resene brushes
- Resene testpots in your choice of colours — we used Resene Paper Doll, Resene Geronimo, Resene Scrumptious, Resene Glorious, Resene Vibe, Resene Wet N Wild, Resene Pelorous, Resene Comfort Zone, Resene Soft Apple and Resene True Blue
- Super glue, or glue gun and glue sticks
- Greenery (we used olive tree branches, but you could use fake greenery for a longer lasting wreath)
- Green twine or jute rope (2mm)
- Ribbon to hang the wreath
Step one: Take one of the branches and cut it to size according to your wreath. This will become your “measuring stick” to cut the rest of the branches to size. Note: Leigh only decorated the bottom half of the wreath with branches.
Step two: Take four of the branches, and tie them together, leaving 4cm top and bottom untied. Repeat until you have enough to cover the wreath.
Step three: Thread through and tie onto the wreath, rearranging the leaves to cover the twine.
Step four: Take the tissue paper and thread through the top wreath frame, to create a nest for the eggs to be glued onto.
Step five: Paint the eggs in your chosen Resene colours to create the pattern or look you desire. Leigh used Resene Paper Doll, Resene Geronimo, Resene Scrumptious, Resene Glorious, Resene Vibe, Resene Wet N Wild, Resene Pelorous, Resene Comfort Zone, Resene Soft Apple and Resene True Blue. Leave to dry.
Step six: Arrange your ribbon into place, at top centre, to help with egg placement.
Step seven: Arrange the eggs, and glue onto the tissue paper and wreath.
Step eight: Cut away any excess tissue paper, and you’re done! Enjoy your beautiful, seasonal wreath.
Top tip: For a little extra shimmer and shine, try painting some of the eggs with Resene FX Metallic.

project Leigh Stockton
image Bryce Carleton
video Ben Whorwood
Published: 24 Mar 2021

