
latest
habitat tv

Say goodbye to the morning scramble for keys, coats and sunglasses and hello to this… see this and more videos
blog

Re-living the 1980s through art
Clint C is an artist whose work instantly sparks recognition and joy. Based in Hamilton,… more
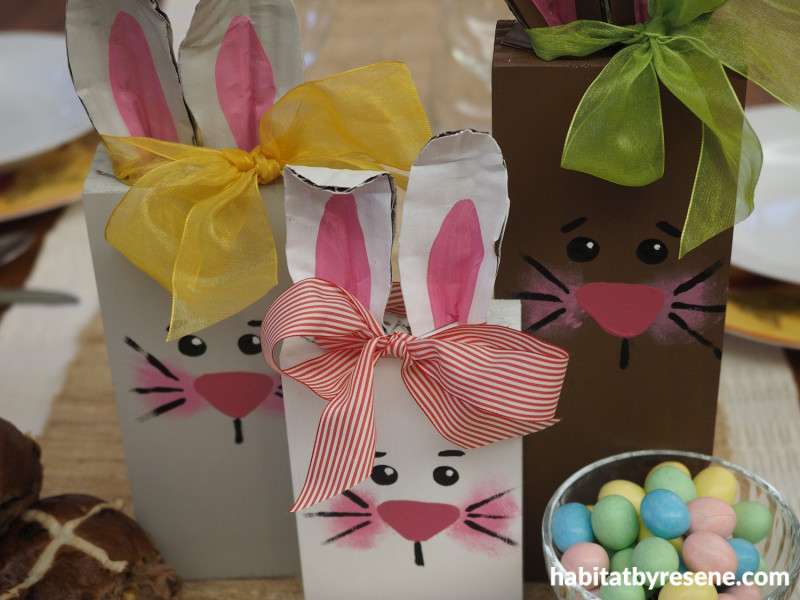
Decorate your table with these cute wooden Easter bunnies
31 Mar 2021
Create a fun family of Easter bunnies to brighten your table this Easter. These cute critters use blocks of wood and reused cardboard to enrich your dining experience. They also make cute homemade gifts for guests who aren’t fans of chocolate.
You will need:
- Wood: 60cm length of 90mm x 42mm untreated pine. Cut this into 3 lengths – 15cm, 20cm and 25cm.
- Saw or drop saw
- Sandpaper, both medium and fine grit
- Resene testpots in your choice of colours; Fleur used Resene Quarter Milk White, Resene Truffle, Resene Irish Coffee, Resene Black, Resene Hopskotch and Resene Rouge for her bunnies.
- Paint brush and a small artist’s paint brush
- Cardboard
- Scissors
- Toothpick
- Small piece of foam or sponge
- Staple gun
- 3 lengths of ribbon

Step 1: Start by cutting the pine wood into three lengths: 15cm, 20cm and 25cm. Sand any rough edges smooth.

Step 2: Paint the various pieces of wood in different Resene colours. Fleur painted the 15cm piece of wood in Resene Quarter Milk White, the 20cm piece of wood in Resene Truffle, and the 25cm piece of wood in Resene Irish Coffee.

Step 3: While the paint on the wooden base is drying, use scissors to cut three pairs of bunny ears out of cardboard. An old cardboard box will do the trick.

Step 4: Paint your bunny ears in the same shade as the corresponding block of wood. Fleur painted the smallest pair of ears in Resene Quarter Milk White, the middle sized ears in Resene Truffle, and the largest ears in Resene Irish Coffee. Once this paint is dry, paint on the inner ear – Fleur used Resene Hopskotch.

Step 5: Use a small artist’s paint brush to paint on the eyes and eyebrows. Fleur used Resene Black for the eyes. With a toothpick, paint on a small dot of white for the shine in the eye - Fleur used Resene Quarter Milk White.

Step 6: Use a small piece of foam to dab a bright pink lightly on to the cheeks. Fleur used Resene Hopskotch to match the inner ears of the bunnies. Do this with a small amount of paint by dabbing the foam lightly into the paint and scraping the paint off on the edge of the testpot. Next, paint on a triangular nose in a darker shade of pink – Fleur used Resene Rouge.

Step 7: Finish off the face by painting a mouth and whiskers - Fleur used Resene Black.

Step 8: To shape the ears, cut a slit at the bottom and bend the two flaps back. Mould the ears into shape.

Step 9: Staple the ears on to the top of the head with a staple gun.

Step 10: Finish by tying a ribbon in a bow around each pair of ears on each bunny.
project and images Fleur Thorpe
Published: 31 Mar 2021

