
latest
habitat tv

Say goodbye to the morning scramble for keys, coats and sunglasses and hello to this… see this and more videos
blog

Re-living the 1980s through art
Clint C is an artist whose work instantly sparks recognition and joy. Based in Hamilton,… more
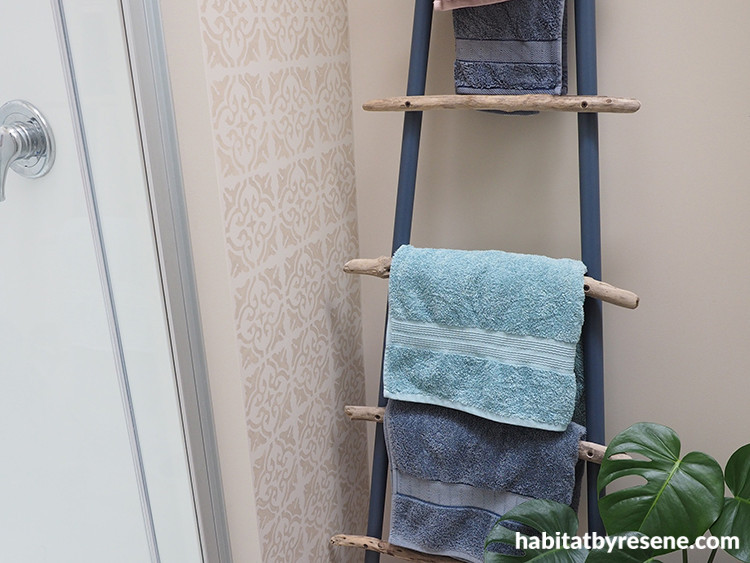
Bring beach vibes into your home with this DIY driftwood ladder
21 Oct 2020
Rustic and beachy, this easy-to-make driftwood ladder is a handsome addition to any room. You can paint it in any Resene testpot colours you like, and use it for hanging lightweight goods, like towels or blankets, or as a piece of décor reminiscent of sand, salt and sea.
You will need:
- 2 x dowel, 30mm diameter and 1.8m long
- A saw
- Sandpaper
- Resene Quick Dry
- Electric drill, drill bit, countersink
- A paintbrush
- 5 pieces of driftwood, each 35cm – 60cm long
- 10 x screws
- A Resene testpot in a colour of your choice – Fleur used Resene Rhino
Step 1 Cut both of your lengths of dowel down to 1.6m long. Gently sand any rough bits, then wipe away dust with a clean cloth.

Step 2 With a pencil, draw a straight line down the length of both dowels. Then, from the bottom, measure up 30cm and make a mark. This is where the bottom rung of the ladder will go. From this mark, measure up 26cm. This will be the second rung. Measure out the spacing for the remaining three rungs, each 26cm apart.
Use an electric drill to drill holes part way into the dowel but not the whole way through. Use a drill bit that is slightly smaller than the diameter of your screw thread.

Step 3 Using Resene Quick Dry, evenly prime the dowels. Once dry, use fine sandpaper to lightly sand the dowels to create a smooth surface for your paint.

Step 4 Next, paint the dowels in your choice of Resene paint colour. To highlight the ladder’s beach theme, we recommend using deep blues or soft beiges, like Resene Rhino, Resene Ship Cove and Resene Biscotti. Do two coats, allowing for the first coat to dry before applying the second.

Step 5 For the ladder’s rungs, collect five pieces of relatively straight, sturdy driftwood, ranging in length from roughly 35cm to 60cm.

Step 6 With a pencil, mark where you’d like your pieces of drift wood to attach to the dowels on both ends. Use an electric drill to drill through both ends of the driftwood, then countersink the holes. This will ensure your screws will sit flush against the wood.

Step 7 Screw the driftwood rungs onto the dowel uprights.

Step 8 To prevent your ladder from slipping on a smooth surface, stick a rubber grip pad to the bottom of each of the dowels.

Practical and versatile, this driftwood ladder makes for a great addition to your bathroom. The deep blue of the ladder’s dowels in Resene Rhino contrast against the beige, almost sandy tones of this bathroom with walls in Resene Triple Blanc.
Top tip: To make the driftwood sections easier to wipe clean finish them with Resene Aquaclear waterborne clear urethane.
images and project by Fleur Thorpe
Published: 21 Oct 2020

