
latest
habitat tv

Say goodbye to the morning scramble for keys, coats and sunglasses and hello to this… see this and more videos
blog

Re-living the 1980s through art
Clint C is an artist whose work instantly sparks recognition and joy. Based in Hamilton,… more

Stripes are in. Or up and down. Or side to side. Whichever way, stripes are covering our interior surfaces in all sorts of creative ways. There are the regular, even-sized stripes using just two colours, right through to multi-coloured stripes of varying thickness and colour. And if you want to inject your own creativity and want flexibility of design, the best way to achieve the striped look is by paint. Resene paint. And if you don’t feel you have the skills or patience to paint, there are many striped wallpapers available through Resene ColorShops.
We first started seeing stripes a couple of years ago – mostly as verticals, often looking like that classic French canvas you used to see covering deck chairs. A very current way to do stripes is horizontally rather than vertically, and in the latest Habitat magazine, we feature this hallway with stripes on the ceiling painted by creative homeowner Tori Davidon-Harron. Central to the bedrooms and seen from the living area, the hall ceiling became her canvas. On went stripes in Resene Onepoto (blue), Resene Dust Storm (pink), Resene Knock Out (red) and Resene Alabaster (white), inspired by the colours in an old Tip Top sign. By taking the stripes along the ceiling and up the return to a high clerestory window, the stripes are given a finishing point.
We also got a great response when we featured a house a few months on Habitat of the Week with a bold black and white striped wallpaper that was hung horizontally rather then vertically – you’ll see it again when you click through.
Here are a few tips on how to do it, and also a short step-by-step guide on painting a striped wall.
For complicated patterns and full walls
- Consider transferring your stripe pattern onto a batten so that then becomes your measuring stick.
- Or print the pattern on to more heavy paper and use it as a template.
- Use low-tack masking tape
- Don’t overload your roller or brush and make sure to remove the tape before the paint is dry.
- Break the wall down into more manageable sections; don’t do the whole wall all at once.
- Put Xs of masking tape at the top of the stripes that are the third colour so that you don’t accidentally paint them with the second colour.
- Another way to keep track is to draw arrows on the tape pointing towards the area to be painted; add the initial/s of the paint colour.
- If it’s a full wall of vertical stripes, divide it into the number of stripes you want to paint and mark the top of each stripe at the ceiling line in pencil. Hang a plumb bob from the mark with a drawing pin and string and use it to rule the stripe onto the wall.
- If the stripes are horizontal, start at the top and work down.

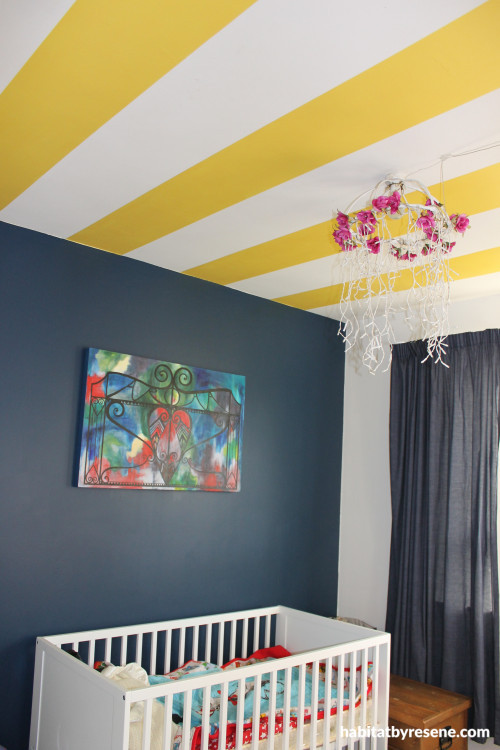
Homeowner Rebekah Fraser sent us this photo of her spare room cum nursery. She painted the stripes in Resene Wild Thing as well as a feature wall in the rich navy Resene Bunting.

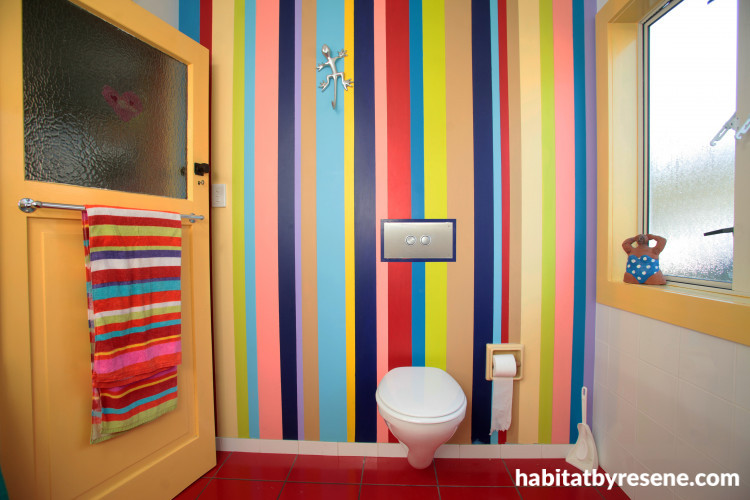
Who says the littlest room in the house has to be boring? Artist Val Griffith-Jones treated hers to a striped paint job using a collection of old Resene testpots. Gorgeous.

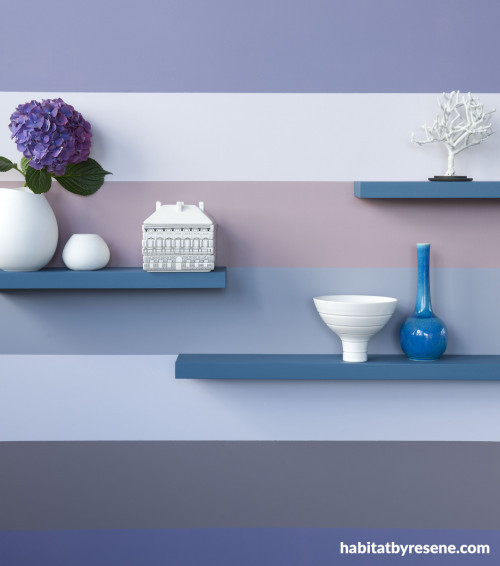
The stripes on this wall are in subtle tones of lavender, while the shelves provide another striped element as well as a sharp accent. From top to bottom, the colour are Resene Covert, Resene I Do, Resene Bona Fide, Resene Kookaburra and Resene Poet. The shelves are Resene Wanaka.

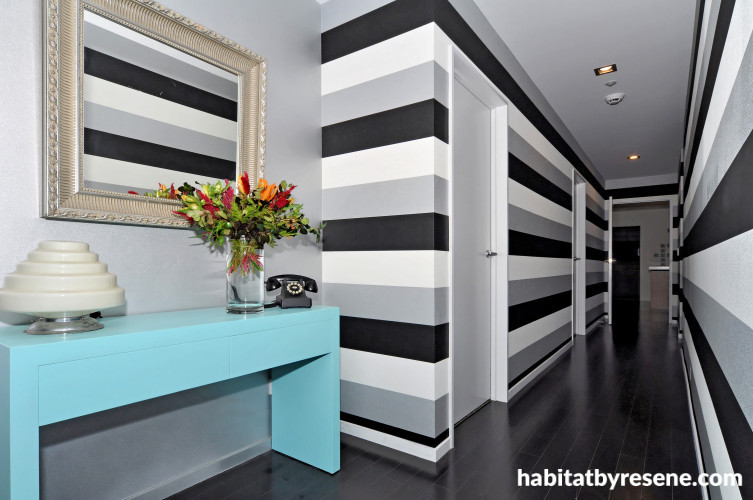
This image caused a stir when we posted it a few months ago. Homeowner Melanie Arnold created the striking look with Room 20 Wallpaper 8803-69 from Resene hung horizontally instead of vertically. She then painted the walls beside it in Resene Enamacryl Metallic Silver Aluminium and the old sideboard in Resene Lustacryl tinted to Resene Onepoto.


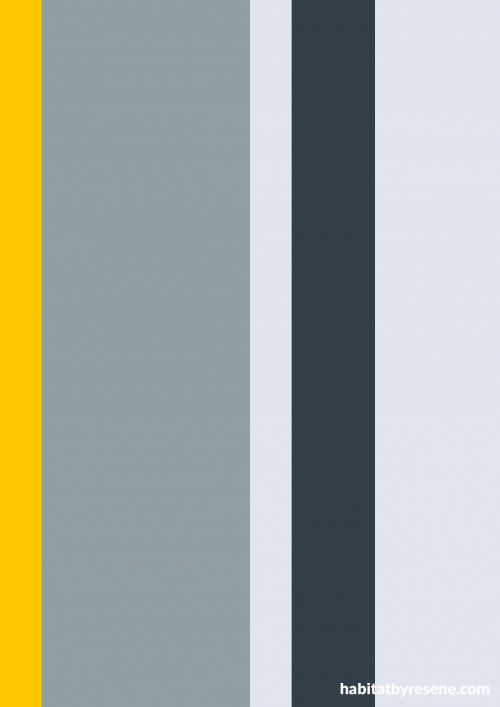
Painting stripes on your walls, or ceiling, or wherever, is easy. All it takes is a design, some paint, masking tape, a brush or speed brush, and come concentration. In the following frames, we show you how to paint this pattern in blue-greys with a shot of yellow, using Resene Half New Denim Blue, Resene Half Regent Grey, with Resene Spotlight accents on a Resene Half Breathless background. You can even print this image and use it as a template.

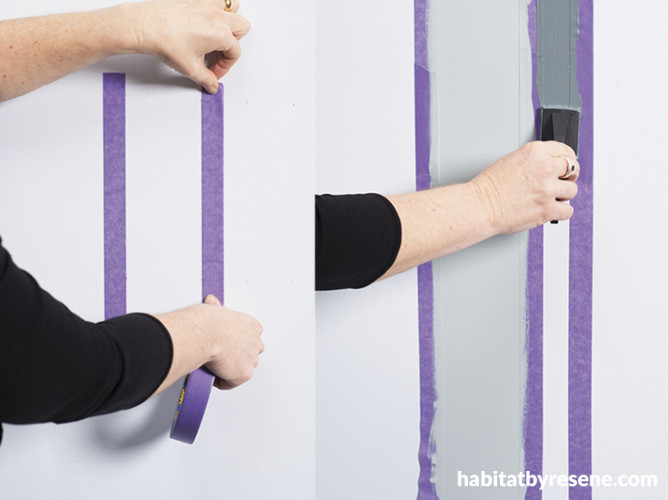
Step 1: If the pattern is quite complex, mark it out first on card or even on a batten so that you can use that as a guide. Paint the lightest colour over the complete area, in our case Resene Half Breathless, where you wish to create stripes and allow the paint to dry. Depending on the size, either use a roller or a speed brush. If it’s a full wall of vertical stripes, divide it into the number of stripes you want to paint and mark the top of each stripe at the ceiling line in pencil. Hang a plumb bob from the mark with a drawing pin and string and use it to rule the stripe onto the wall. If the stripes are horizontal, start at the top and work down.
Place low tack masking tape along the edge where you want the stripe to go. With this pattern we can paint the mid and dark greys (Resene Half Regent Grey and Resene Half New Denim blue) at the same time. Make sure the edge of the tape sticks well (run along the edge with a plastic putty knife or similar) or the paint will creep underneath it. Paint on the Resene Half Regent Grey. Remove the tape before the paint fully dries.
Step 2: Paint the Resene Half Regent Grey and Resene Half New Denim Blue using an appropriate size of speed brush (this will give a smoother finish than a standard paint brush).

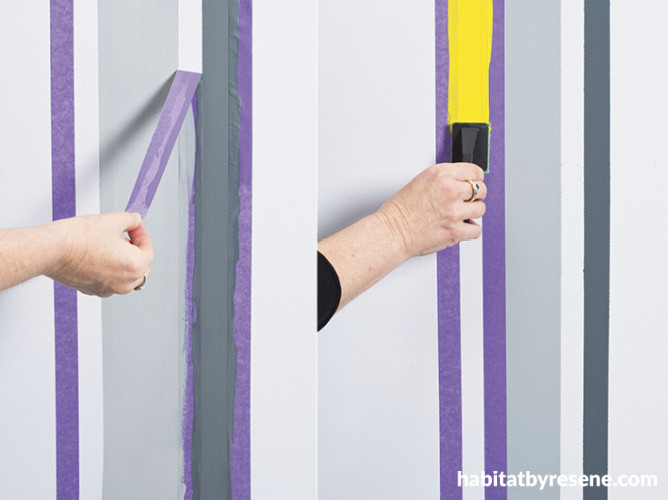
Step 3: Carefully remove the tape from the area where the third colour will go but not from the lightest colour before the paint dries.
Step 4: Mask either side of the stripe where the accent stripe will go. Paint with Resene Spotlight. Carefully remove the masking tape before the paint is entirely dry.

Bored with plain? Try stripes
Published: 17 Oct 2013
Do you have a home full of wonderful Resene paint and colour? Send us some snaps by emailing [email protected].
Up and down, or side to side

Stripes are in. Or up and down. Or side to side. Whichever way, stripes are covering our interior surfaces in all sorts of creative ways. There are the regular, even-sized stripes using just two colours, right through to multi-coloured stripes of varying thickness and colour. And if you want to inject your own creativity and want flexibility of design, the best way to achieve the striped look is by paint. Resene paint. And if you don’t feel you have the skills or patience to paint, there are many striped wallpapers available through Resene ColorShops.
We first started seeing stripes a couple of years ago – mostly as verticals, often looking like that classic French canvas you used to see covering deck chairs. A very current way to do stripes is horizontally rather than vertically, and in the latest Habitat magazine, we feature this hallway with stripes on the ceiling painted by creative homeowner Tori Davidon-Harron. Central to the bedrooms and seen from the living area, the hall ceiling became her canvas. On went stripes in Resene Onepoto (blue), Resene Dust Storm (pink), Resene Knock Out (red) and Resene Alabaster (white), inspired by the colours in an old Tip Top sign. By taking the stripes along the ceiling and up the return to a high clerestory window, the stripes are given a finishing point.
We also got a great response when we featured a house a few months on Habitat of the Week with a bold black and white striped wallpaper that was hung horizontally rather then vertically – you’ll see it again when you click through.
Here are a few tips on how to do it, and also a short step-by-step guide on painting a striped wall.
For complicated patterns and full walls
- Consider transferring your stripe pattern onto a batten so that then becomes your measuring stick.
- Or print the pattern on to more heavy paper and use it as a template.
- Use low-tack masking tape
- Don’t overload your roller or brush and make sure to remove the tape before the paint is dry.
- Break the wall down into more manageable sections; don’t do the whole wall all at once.
- Put Xs of masking tape at the top of the stripes that are the third colour so that you don’t accidentally paint them with the second colour.
- Another way to keep track is to draw arrows on the tape pointing towards the area to be painted; add the initial/s of the paint colour.
- If it’s a full wall of vertical stripes, divide it into the number of stripes you want to paint and mark the top of each stripe at the ceiling line in pencil. Hang a plumb bob from the mark with a drawing pin and string and use it to rule the stripe onto the wall.
- If the stripes are horizontal, start at the top and work down.
pictures Photographs by Renee Lawrence
Doing the wild thing
Homeowner Rebekah Fraser sent us this photo of her spare room cum nursery. She painted the stripes in Resene Wild Thing as well as a feature wall in the rich navy Resene Bunting.
Fun where it counts
Who says the littlest room in the house has to be boring? Artist Val Griffith-Jones treated hers to a striped paint job using a collection of old Resene testpots. Gorgeous.
Licks of lavender
The stripes on this wall are in subtle tones of lavender, while the shelves provide another striped element as well as a sharp accent. From top to bottom, the colour are Resene Covert, Resene I Do, Resene Bona Fide, Resene Kookaburra and Resene Poet. The shelves are Resene Wanaka.
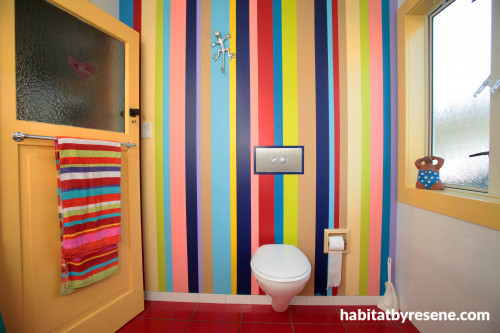
Side to side
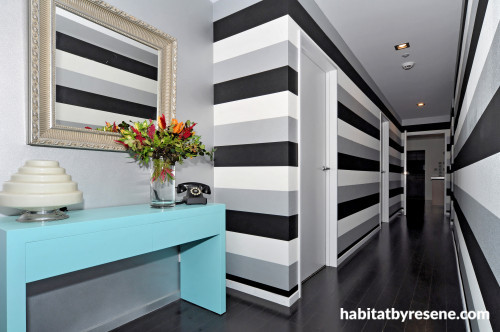
This image caused a stir when we posted it a few months ago. Homeowner Melanie Arnold created the striking look with Room 20 Wallpaper 8803-69 from Resene hung horizontally instead of vertically. She then painted the walls beside it in Resene Enamacryl Metallic Silver Aluminium and the old sideboard in Resene Lustacryl tinted to Resene Onepoto.
Now, with feeling
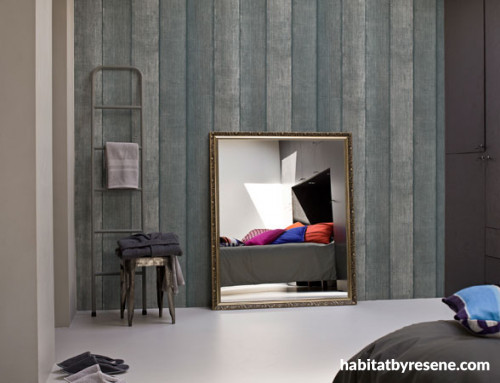
Here’s a slightly different take on a stripe – a natural textured one achieved with wallpaper from Elements range (no 46542), available through Resene ColorShops.
Get the painted stripe look
Painting stripes on your walls, or ceiling, or wherever, is easy. All it takes is a design, some paint, masking tape, a brush or speed brush, and come concentration. In the following frames, we show you how to paint this pattern in blue-greys with a shot of yellow, using Resene Half New Denim Blue, Resene Half Regent Grey, with Resene Spotlight accents on a Resene Half Breathless background. You can even print this image and use it as a template.
Steps 1 and 2
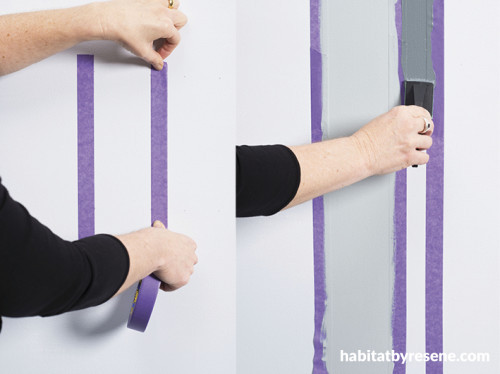
Step 1: If the pattern is quite complex, mark it out first on card or even on a batten so that you can use that as a guide. Paint the lightest colour over the complete area, in our case Resene Half Breathless, where you wish to create stripes and allow the paint to dry. Depending on the size, either use a roller or a speed brush. If it’s a full wall of vertical stripes, divide it into the number of stripes you want to paint and mark the top of each stripe at the ceiling line in pencil. Hang a plumb bob from the mark with a drawing pin and string and use it to rule the stripe onto the wall. If the stripes are horizontal, start at the top and work down.
Place low tack masking tape along the edge where you want the stripe to go. With this pattern we can paint the mid and dark greys (Resene Half Regent Grey and Resene Half New Denim blue) at the same time. Make sure the edge of the tape sticks well (run along the edge with a plastic putty knife or similar) or the paint will creep underneath it. Paint on the Resene Half Regent Grey. Remove the tape before the paint fully dries.
Step 2: Paint the Resene Half Regent Grey and Resene Half New Denim Blue using an appropriate size of speed brush (this will give a smoother finish than a standard paint brush).
Steps 3 and 4

Step 3: Carefully remove the tape from the area where the third colour will go but not from the lightest colour before the paint dries.
Step 4: Mask either side of the stripe where the accent stripe will go. Paint with Resene Spotlight. Carefully remove the masking tape before the paint is entirely dry.


the look
If you're stuck on what
colour to use or need colour
advice, try out the Resene
Ask a Colour Expert service.
the look
If you're stuck on what
colour to use or need colour
advice, try out the Resene
Ask a Colour Expert service.

